Scheduled MQTT control
The Scheduled MQTT control is meant for scheduled messages ahead of time. For live control, see Live MQTT Control instead.
This guide will help you configure MQTT on your Sofar EMS to remotely control and monitor battery and solar panel installations.
What you need
- Sofar EMS with internet connectivity.
- MQTT credentials: This can be requested by sending an email to support@eniris.be.
- Python development environment (or any other MQTT client). This guide uses a basic example written in Python to get you started with MQTT and sending commands. We recommend to use Python for the ease of use, but any other MQTT client is supported.
Extra information
MQTT is a fast communication protocol over the internet. It is a publish/subscribe message systems, which allows for a direct connection between your machine and the Sofar EMS. Your assets are classified into solar, battery, EV, and HVAC groups. At the moment, this integration allows for control per group, not per device.
First-time Configuration (Starting point for new users)
I have a Sofar EMS that I'd like to setup for MQTT Remote Control.
1. Check your network
Ensure that your network allows mqtt network traffic over port 1883. You can do this using command:
nc -zv mqtt.eniris.be 1883
When this command is not available, you can alternatively download and execute this python code.
When in in doubt, consult your network engineer or temporarily use your phone's 4G/5G hotspot when connection errors occur.
When port 1883 is not accessible from your network, we offer a backup at port 80. This can be configured in your MQTT-client at a later step in this manual.
2. Add your devices
Login to the commissioning interface and make sure the devices are added to the Sofar EMS.
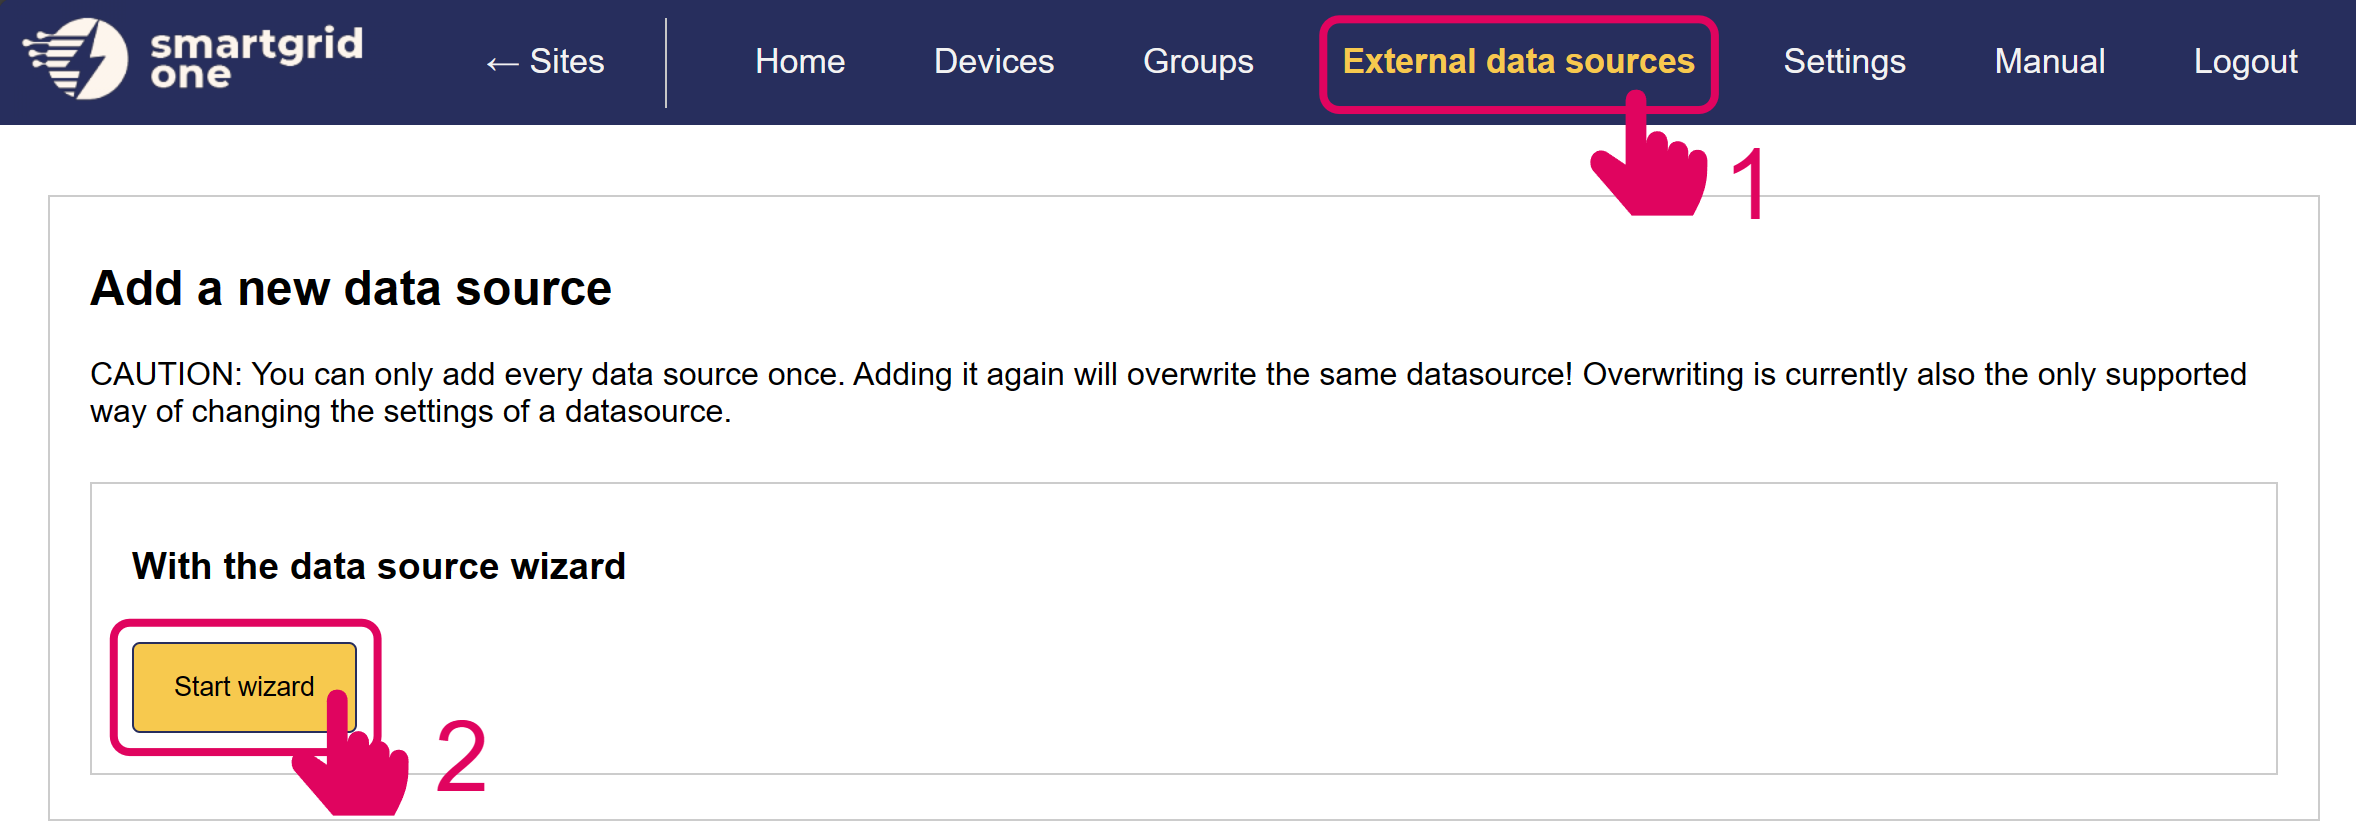
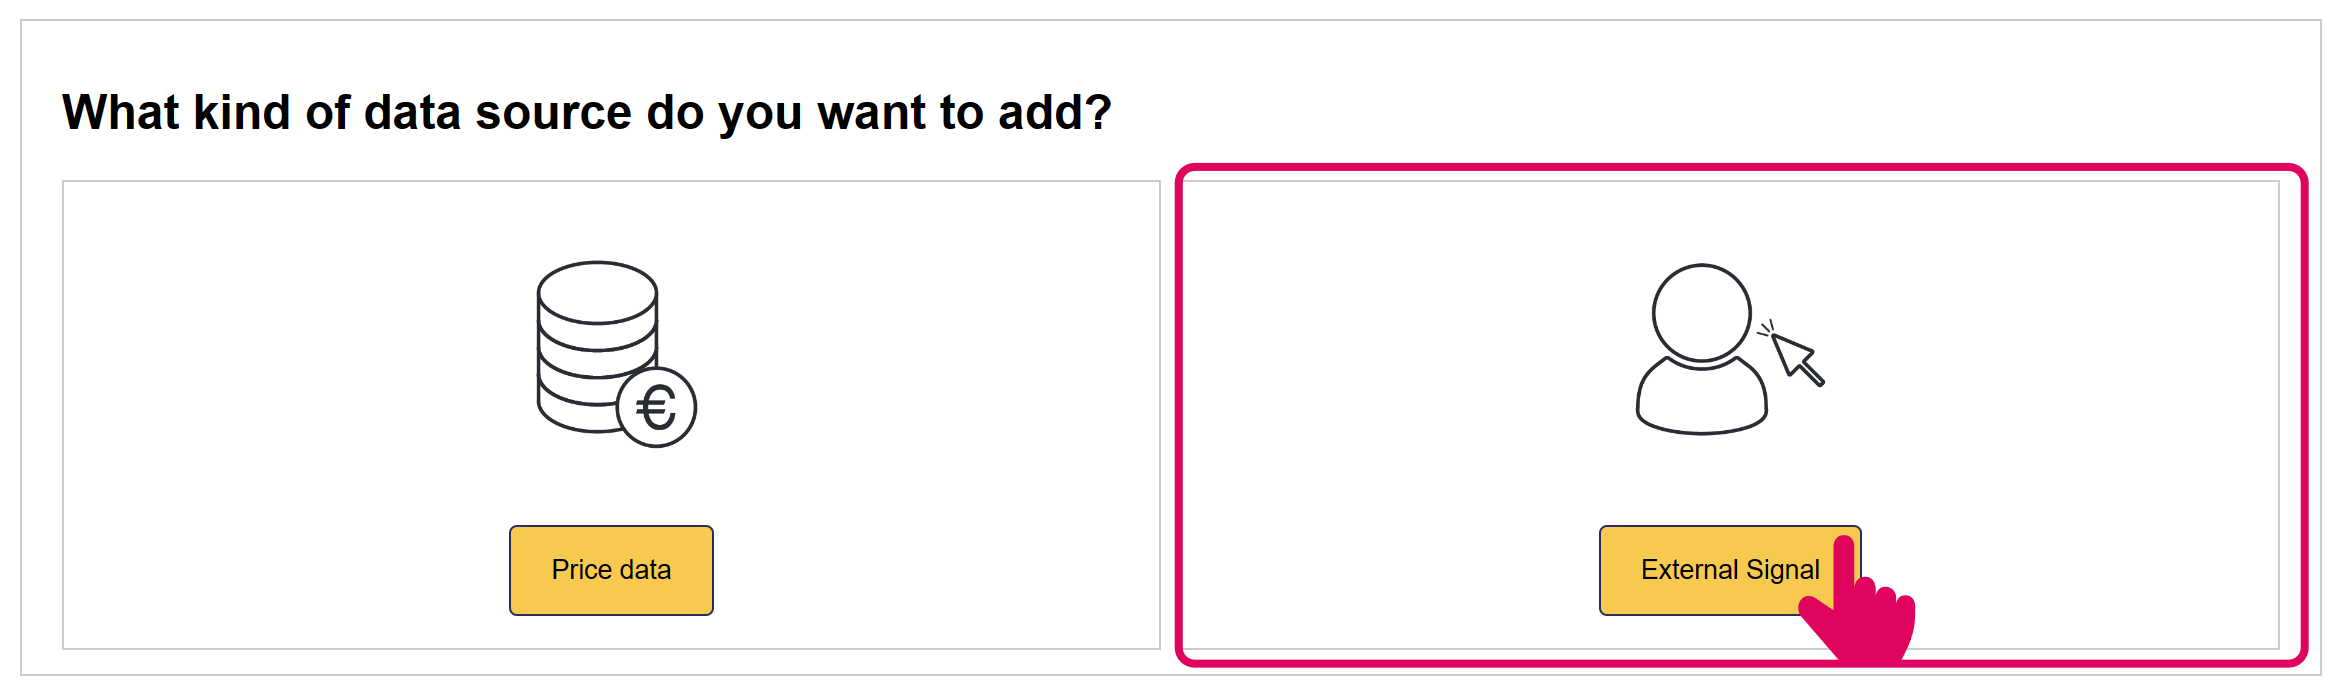
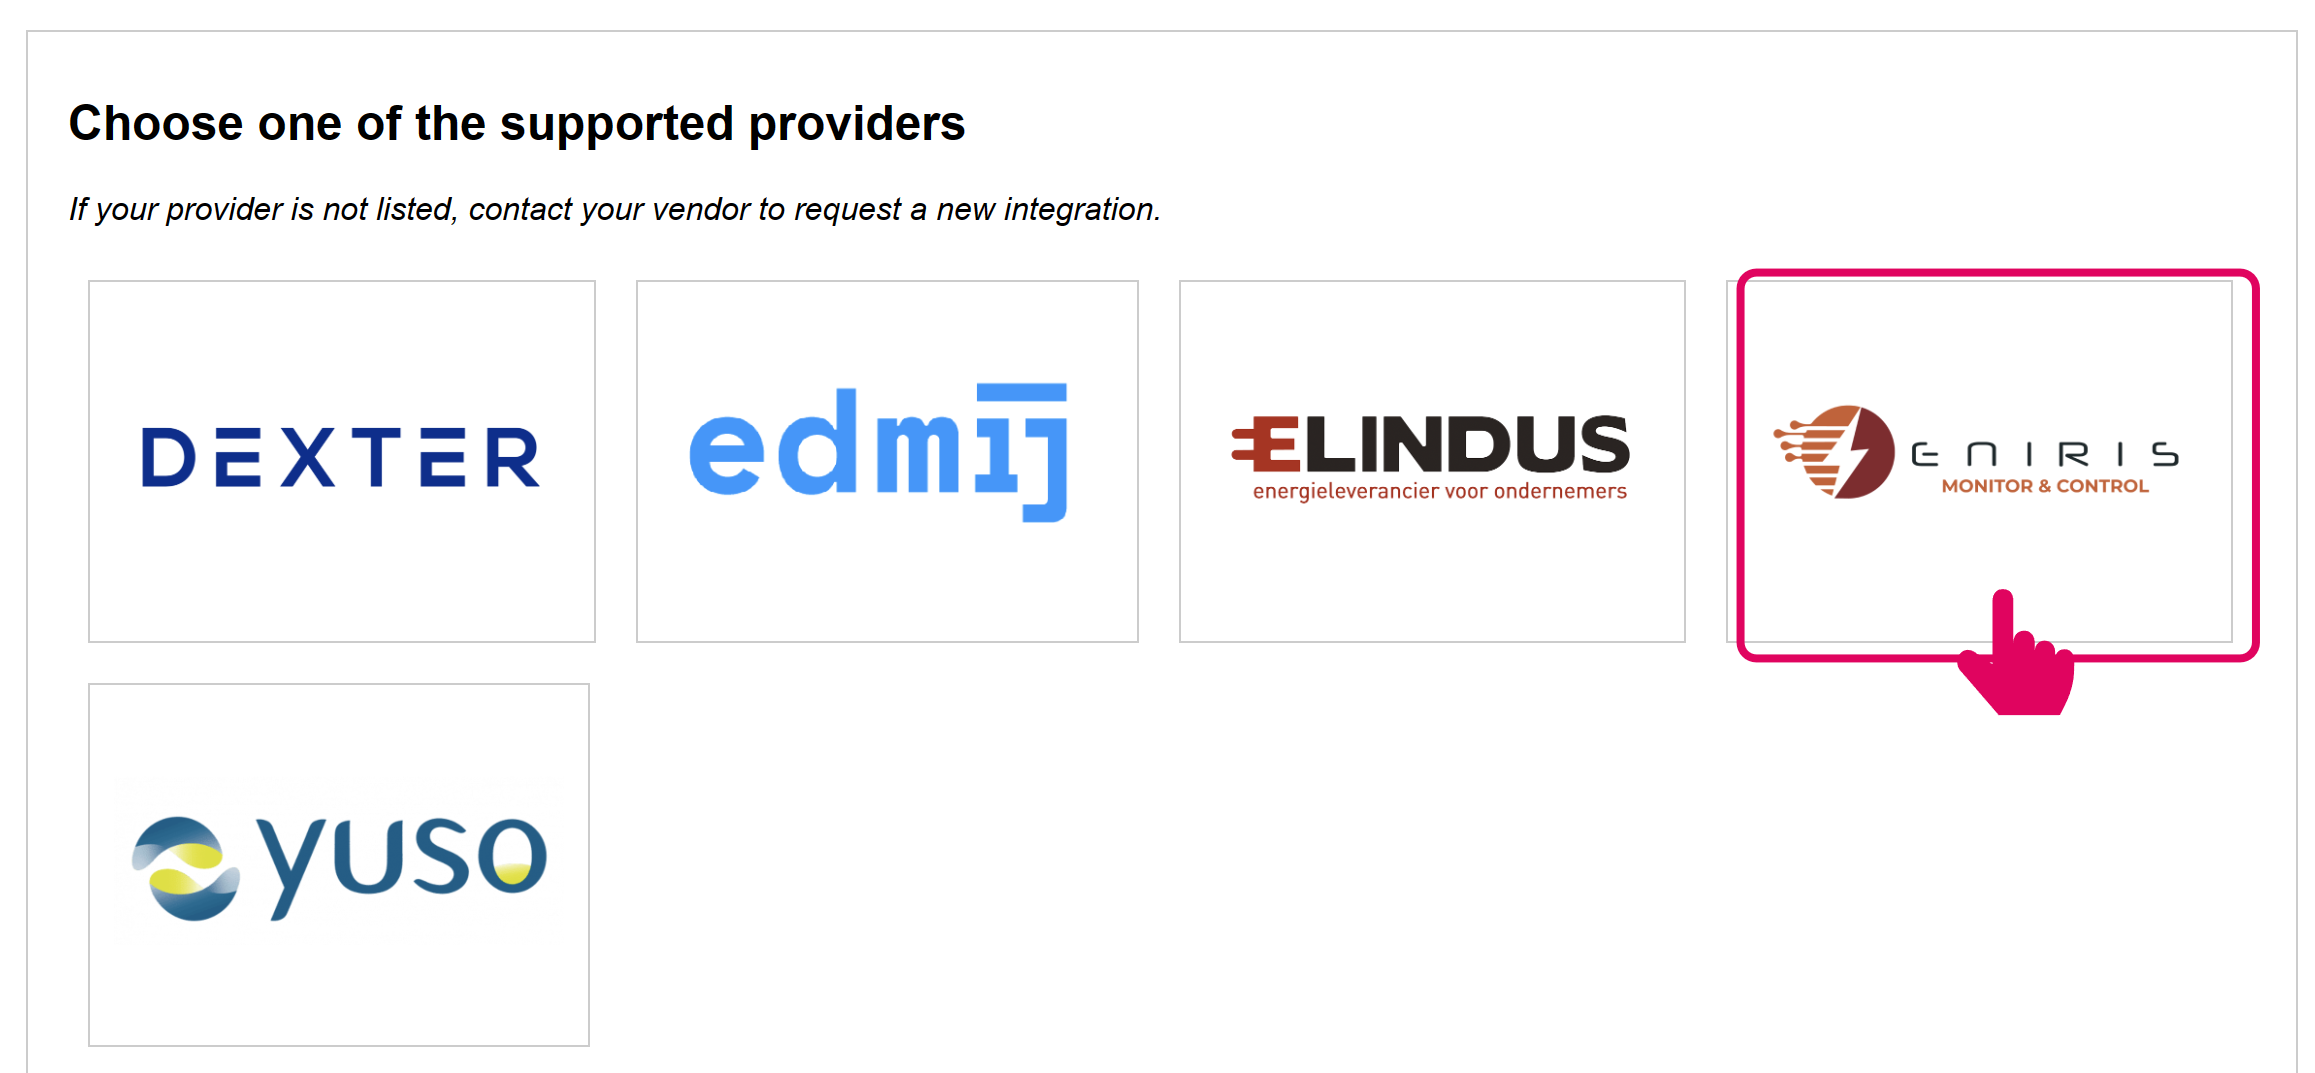
3. Add the MQTT external signal
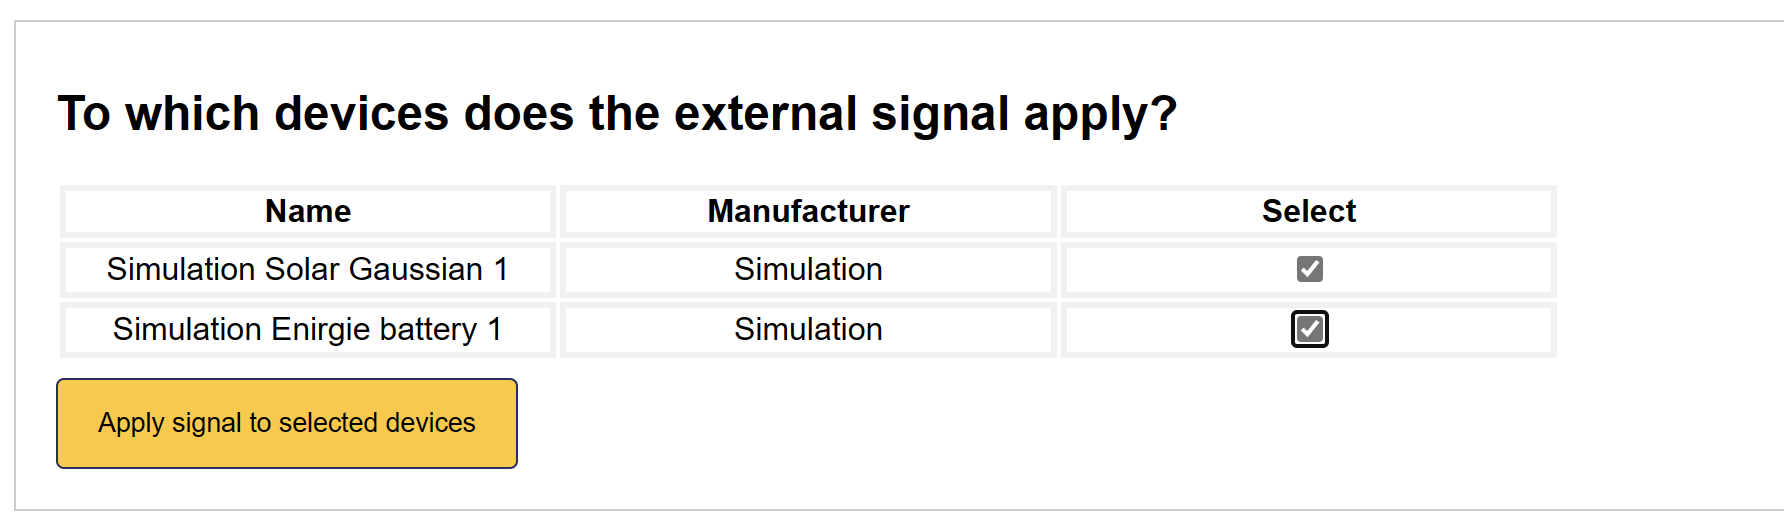
4. Enable MQTT remote signal
Select all devices that you'd wish to include in MQTT Remote Control.
5. Remote signal is added
The MQTT Remote Control interface has now been activated on the Sofar EMS.
We are now ready to send some basics commands using a simple example. The Status column tells you if any command is active.
Python demo script
A good first starting point would be to test your newly setup integration with a simple example.
This test code does a simple job of continuously sending the following schedule:
- Battery: Charge at 5 kW for 15 minutes in 10 minutes
- Solar: Set power to 0 kW for an hour in 30 minutes
The Sofar EMS responds with an acknowledgement message containing the unique schedule identifier, or an error message.
We then fetch the next schedule for both device types, confirming that the command was successful.
Please download the file below in your preferred Python IDE. Fill in your serial number and MQTT-credentials and execute the script:
When the above is successful, you can continue with sending other type of messages. All messages are described below.
MQTT Documentation for Sending Commands
This section details the MQTT messaging format and payload requirements for setting up scheduled control of devices within the Sofar EMS's network.
MQTT Topics
- Subscribe Topic:
standard1/rp_one_s/remoteScheduleMetrics/<controller SN> - Feedback Topic:
standard1/outbound/remoteScheduleMetrics/feedback/<controller SN>
Where <controller SN> should be replaced with the actual serial number of the Sofar EMS you intend to control.
MQTT Message Types
1. Set Schedule (set_schedule)
Creates a new schedule for a device type.
{
    "extraTags": {
        "nodeId": "<Controller SN>_site_0"
    },
    "time": <Unix Timestamp>,
    "message_type": "set_schedule",
    "fields": {
        "device_type": "<Device Type>",
        "node_id": "<Node ID>" (Optional),
        "start_time": <Unix Timestamp>,
        "end_time": <Unix Timestamp>,
        "policy": "<Policy>",
        "power_setpoint_w": <Setpoint in watts>,
        "site_import": <Site Import in Watts>,
        "site_export": <Site Export in Watts>,
        "remove_overlap": <True/False> (Optional) (default=False),
        "tag": <Tag String> (Optional) (default=None),
    }
}
Response (Success):
{
    "requestTime": <Unix Timestamp>,
    "time": <Unix Timestamp>,
    "siteNodeId": "<Controller SN>_site_0",
    "data": {
        "message_type": "set_schedule_ack",
        "state": {
            "schedule_id": <Schedule ID>,
            "deleted_ids": <Schedulde IDs deleted if remove_overlap=True>
            "tag": <Tag String> (default=None),
        },
        "responseCode": 0
    }
}
2. Set Schedules (set_schedules)
Creates multiple new schedules.
{
    "extraTags": {
        "nodeId": "<Controller SN>_site_0"
    },
    "time": <Unix Timestamp>,
    "message_type": "set_schedules",
    "fields":
        "0": "{
            "device_type": "<Device Type>",
            "node_id": "<Node ID>" (Optional),
            "start_time": <Unix Timestamp>,
            "end_time": <Unix Timestamp>,
            "policy": "<Policy>",
            "power_setpoint_w": <Setpoint in watts>,
            "site_import": <Site Import in Watts>,
            "site_export": <Site Export in Watts>,
            "remove_overlap": <True/False> (Optional) (default=False),
        }",
        "1": "{
            "device_type": "<Device Type>",
            "node_id": "<Node ID>" (Optional),
            "start_time": <Unix Timestamp>,
            "end_time": <Unix Timestamp>,
            "policy": "<Policy>",
            "power_setpoint_w": <Setpoint in watts>,
            "site_import": <Site Import in Watts>,
            "site_export": <Site Export in Watts>,
            "remove_overlap": <True/False> (Optional) (default=False),
        }",
        ...
}
Response (Success):
{
    "requestTime": <Unix Timestamp>,
    "time": <Unix Timestamp>,
    "siteNodeId": "<Controller SN>_site_0",
    "data": {
        "message_type": "set_schedules_ack",
        "state": {
            "schedule_ids": <Schedule IDs>,
            "deleted_ids": <Schedulde IDs deleted if remove_overlap=True>
        },
        "responseCode": 0
    }
}
3. Get Schedule (get_schedule)
Retrieves a specific schedule by ID.
{
    "extraTags": {
        "nodeId": "<Controller SN>_site_0"
    },
    "time": <Unix Timestamp>,
    "message_type": "get_schedule",
    "fields": {
        "id": <Schedule ID>
    }
}
Response:
{
    "requestTime": <Unix Timestamp>,
    "time": <Unix Timestamp>,
    "siteNodeId": "<Controller SN>_site_0",
    "data": {
        "message_type": "get_schedule_ack",
        "state": <Schedule>,
        "responseCode": 0
    }
}
4. Get Active Schedule (get_active_schedule)
Retrieves the currently active schedule for a device type.
{
    "extraTags": {
        "nodeId": "<Controller SN>_site_0"
    },
    "time": <Unix Timestamp>,
    "message_type": "get_active_schedule",
    "fields": {
        "device_type": "<Device Type>",
        "node_id": "<Node ID>" (Optional),
    }
}
Response (Success):
{
    "requestTime": <Unix Timestamp>,
    "time": <Unix Timestamp>,
    "siteNodeId": "<Controller SN>_site_0",
    "data": {
        "message_type": "get_active_schedule_ack",
        "state": <Schedule>,
        "responseCode": 0
    }
}
5. Get Next Schedule (get_next_schedule)
Retrieves the next upcoming schedule for a device type.
{
    "extraTags": {
        "nodeId": "<Controller SN>_site_0"
    },
    "time": <Unix Timestamp>,
    "message_type": "get_next_schedule",
    "fields": {
        "device_type": "<Device Type>",
        "node_id": "<Node ID>" (Optional),
    }
}
Response (Success):
{
    "requestTime": <Unix Timestamp>,
    "time": <Unix Timestamp>,
    "siteNodeId": "<Controller SN>_site_0",
    "data": {
        "message_type": "get_next_schedule_ack",
        "state": <Schedule>,
        "responseCode": 0
    }
}
6. Get Schedules (get_schedules)
Retrieves all schedules for a specific date.
{
    "extraTags": {
        "nodeId": "<Controller SN>_site_0"
    },
    "time": <Unix Timestamp>,
    "message_type": "get_schedules",
    "fields": {
        "date": "<Date String of Format dd/mm/yyyy>"
    }
}
Response (Success):
{
    "requestTime": <Unix Timestamp>,
    "time": <Unix Timestamp>,
    "siteNodeId": "<Controller SN>_site_0",
    "data": {
        "message_type": "get_schedules_ack",
        "state": {
            "schedules": [<Schedule>, ...]
        },
        "responseCode": 0
    }
}
7. Get Future Schedules (get_future_schedules)
Retrieves all future schedules.
{
    "extraTags": {
        "nodeId": "<Controller SN>_site_0"
    },
    "time": <Unix Timestamp>,
    "message_type": "get_future_schedules",
    "fields": {}
}
Response (Success):
{
    "requestTime": <Unix Timestamp>,
    "time": <Unix Timestamp>,
    "siteNodeId": "<Controller SN>_site_0",
    "data": {
        "message_type": "get_future_schedules_ack",
        "state": {
            "schedules": [<Schedule>, ...]
        },
        "responseCode": 0
    }
}
8. Remove Schedule (remove_schedule)
Removes a specific schedule by ID.
{
    "extraTags": {
        "nodeId": "<Controller SN>_site_0"
    },
    "time": <Unix Timestamp>,
    "message_type": "remove_schedule",
    "fields": {
        "id": <Schedule ID>
    }
}
Response (Success):
{
    "requestTime": <Unix Timestamp>,
    "time": <Unix Timestamp>,
    "siteNodeId": "<Controller SN>_site_0",
    "data": {
        "message_type": "remove_schedule_ack",
        "state": "Schedule <Schedule ID> removed successfully",
        "responseCode": 0
    }
}
9. Get Site Feedback (get_feedback)
Retrieves detailed feedback on the state of the system.
{
    "extraTags": {
        "nodeId": "<Controller SN>_site_0"
    },
    "time": <Unix Timestamp>,
    "message_type": "get_feedback",
    "fields": {
        "device": <Device (node) level>
    }
}
Response (Success):
10. Site Topology (get_toplogy)
Gets the topology of the site.
{
    "extraTags": {
        "nodeId": "<Controller SN>_site_0"
    },
    "time": <Unix Timestamp>,
    "message_type": "get_topology",
    "fields": {}
}
Response (Success):
{
    "requestTime": <Unix Timestamp>,
    "time": <Unix Timestamp>,
    "siteNodeId": "<Controller SN>_site_0",
    "data": {
        "message_type": "get_topology_ack",
        "state": {
            "nodeId": <nodeId>,
            "nodeType": <nodeType>,
            "nomCurrent": <nominalCurrent>
            "children": [{<ChildObject>}]
            },
        "responseCode": 0
    }
}
Standard Schedule Response Format
{
    "id": <Schedule ID>,
    "device_type": "<Device Type>",
    "node_id": "<Node ID>" (Optional),
    "start_time": <Unix Timestamp>,
    "end_time": <Unix Timestamp>,
    "policy": "<Schedule Policy>",
    "power_setpoint_w": <Setpoint in watts>,
    "created_at": <Unix Timestamp>
}
Component Types and Policies
For details about available components and policies that can be scheduled, refer to the MQTT Components and Policies section in the Live MQTT Control documentation.
Device-specific schedules can be sent using the optional node_id field, referring to the node ID of the controllable device.
Error Handling
All messages can return an error response with responseCode: 1 when an error occurs:
{
    "requestTime": <Unix Timestamp>,
    "time": <Unix Timestamp>,
    "siteNodeId": "<Controller SN>_site_0",
    "data": {
        "message_type": "<Message Type>_ack",
        "error": <Error Body>,
        "responseCode": 1
    }
}
When an unrelated error occurs, the message type will be (general_error).
Common errors include:
- Schedule overlap with existing schedules
- Invalid time range
- Device type not found
- Schedule ID not found
- Invalid policy for device type
Schedule Management Rules
- Overlap Rules
- Schedules cannot overlap for the same device type
- Schedules cannot overlap for the same device
- Schedules for the same device and device type cannot overlap
- Existing, overlapping schedules will be deleted if the
remove_overlapvariable is set toTruewhen creating a new schedule.
- Each schedule must have:
- A valid device type
- A start time (Unix timestamp)
- An end time (Unix timestamp)
- A policy (matching the device type's available policies)
- A power setpoint (for policies that require it)
- Start time must be before end time
- If the start time is in the past, it is automatically changed to start now
- Schedules can only be deleted if they have not started yet. Active schedules cannot be deleted.
- Schedules can be set for different device types independently
- The system automatically applies the appropriate policy when a schedule becomes active